Author: Rick (Page 17 of 17)

More from South Carolina

Tonight in my photography course we worked to develop our very first roll of film. I wasn’t sure if I was going to make it through tonight. There weren’t enough dark rooms for everyone, so the teacher had me remove my film in a bag. Basically it was a black plastic back with arm holes so I could removed the film from the canister, thread the film onto a spool, and place it in a developing tank. Well, it took me forever to open the canister (the plastic tip end wouldn’t come off in one piece, so I had to work at it for a while). After that, I had a hard time getting the film threaded onto the spool. That was no fun. In due course a dark room became available. I was able to get the film, spool, and tank out of the bag in the dark room. After a few more minutes of trying, I finally got the film onto the spool and into the tank. All told that process, which should have been less than 5 minutes, took me a little over 15. To help soothe my bruised ego, the teacher did tell me that using the bag can be a little more difficult and usually takes a little practice before everything runs smoothly.

The chemical portion was more tedious than anything else. After I put the film through the fixer, I had 24 developed negatives. One bad thing did happen during the film extraction from the canister – in the process of removing the plastic, I ended up nicking three of the pictures. After photo-flo and drying, I now have 24 negatives. On Thursday we are going to make a contact sheet and prints.

That being the case, I went through some more of my South Carolina photos. Here are some more I think you’ll enjoy.
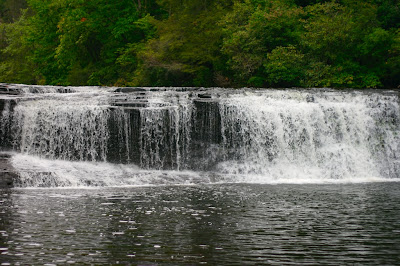

Aperture: f/1.8
Shutter Speed: 1/640
ISO100 with 0ev
Focal Length: 50mm


Aperture: f/22
Shutter Speed: 1/4
ISO100 with 0ev
Focal Length: 50mm

Both the above photos are of Hooker Falls in the Dupont State Forest in North Carolina. I decided to see what I could do if I slowed down the shutter speed from the original (in the top) to the point where motion could be seen. The effect was immediately obvious. The waterfall itself goes from being suspended water drops to constant streams. The water surface in the second photo is a lot more smooth. Since the wind was almost non-existent this day, slowing the shutter speed to 1/4 had a negligible effect on keeping the leaves in focus.


Aperture: f/2.8
Shutter Speed: 1/500
ISO100 with 0ev
Focal Length: 17mm

This is the pool directly in front of Hooker Falls.


Aperture: f/5.6
Shutter Speed: 1/160
ISO100 with 0ev
Focal Length: 50mm

This is Triple Falls in the Dupont State Forest in North Carolina. This is just upstream from Hooker Falls.


Aperture: f/8
Shutter Speed: 1/125
ISO100 with 0ev
Focal Length: 50mm

This is Green River Road at the Cowpens Battlefield in South Carolina near Spartanburg. The battle was part of the Southern Campaign during the American Revolution and fought by troops under the command of General Daniel Morgan. Where I was standing to take this picture was around the area where the Washington Light Cavalry (not associated with General George Washington) was stationed in the order of battle. This battle was significant in that it demonstrated one of the few successful double envelopments in the history of the warfare. What makes this even more impressive is the fact that the double envelopment was performed by an inexperienced general (Gen. Morgan) against Colonel Banstre Tarelton, a pupil of General Lord Cornwallis (known as a military genius of his time). To give perspective, the most notable use of double envelopment was by Hannibal in his defeat of the Romans at Cannae in 216BC.


Aperture: f/3.5
Shutter Speed: 1/2000
ISO100 with 0ev
Focal Length: 27mm

This is the monument in front of the Visitor’s Center at the Cowpens Battlefield National Park near Spartanburg, SC. The plaque lists the key officers involved in the battle on the side of the Continentals. The inscription on the side reads as follows: “The Congress of the United States has caused this monument to be erected on the site of the Battle of Cowpens as a testimonial to the valor and in appreciation of the services of the American troops on this field in behalf of the independence of their country”

The best part of the photos is this – in all cases I did not need to adjust the exposures. In all the above photos, save one, the only processing done was to increase the saturation (I’m still struggling a little with setting proper white balance). The monument photo required just a little bit of straightening as it was crooked by about 2-degrees.

Let me know what you think.

South Carolina

This weekend for Labor Day my wife and I went to Spartanburg, SC to visit her sister. Over the weekend we went to a couple of parks and a couple of historical areas. I took close to 190 pictures with my Canon and my wife took a good number of pictures with the Olympus. One of the places we went was the Walnut Grove Plantation, which was granted to Charles Moore by King George III of England in the 1760’s. Since this was a historical place, I thought making the pictures black and white would have a nice effect. Here is the main house of the plantation along with a small structure with a wagon underneath. Both the master (scaled down) and the digitally processed images are shown.


Aperture: f/2.8
Shutter Speed: 1/2500 sec
ISO100 with 0ev
Focal Length: 17mm


Cropped, exposure dialed back, contrast dialed up, and highlights dodged.


Aperture: f/2.8
Shutter Speed: 1/80
ISO 100 with 0ev
Focal Length: 17mm


Cropped and exposure dialed back.

Here is one last photo I decided to add. It originally was a little underexposed as I metered the wrong area, but that was easily fixed in Aperture. There is also a little noise as this was taken at ISO1600… but I think that would be a little more difficult to detect when the image is scaled down. The thing that really stood out for me was how I was able to get the depth-of-field on the bird almost perfect. The Crucifix on the wall behind the bird was only about 3 or 4 feet away.


Aperture: f/2.8
Shutter Speed: 1/40
ISO1600 with 0ev
Focal Length: 50mm

I’ll post more pictures as I look through them. At this time I think I will leave these black and white versions as the final images because I think it highlights the fact that this is a historical area. Let me know what you think.

Head in the Clouds

In my days right after high school I spent 4 years in the United States Air Force as a weather observer. My job was to watch the weather. Now one may think that’s not exactly a demanding job, but you’re put in direct responsibility for the safety of (in my case) over $1 billion worth of US military hardware. Being an observer is the first step to becoming a fully qualified weather forecaster (better than a lot of professional civilian meteorologists with degrees). Meteorology is not an exact science and the Air Force (along with the US Navy and Marine Corps, the Army gets its weather support from the USAF) requires first-term airmen to be observers as part of the learning process to becoming a forecaster…

Anyway, to avoid this becoming a discourse on a career in military meteorology, I’ll get to the subject. My experience in the Air Force has left me always looking at the clouds and wondering what’s going on up there to make the sky the way it is at that moment. All of the pictures below was taken with my point-and-shoot camera. Some serious photographers may decry the point-and-shoot consumer digital cameras, but they do come in handy and the newer models definitely take some good pictures.


This picture was actually taken by my wife at Brazos Bend State Park. Our original purpose for going there that day was to look at the stars through the 36-inch telescope at the George Observatory, but we were treated to clouds instead. My wife has a good eye and a nice steady hand; she can take a decent picture. These clouds are blowoff from a thunderstorm that passed over the area about 10 minutes prior. When a thunderstorm breaks down, you often get stratocumulus, altocumulus, and cirrus clouds that form from the original thunderstorm.


This one was taken earlier this evening as I was on my way to class. I did do some digital processing to the sky in order to make the clouds pop out more. If you look at the cloud toward the upper left, then move just right and just down, you’ll see the cloud that captured my attention. I wasn’t sure if I was seeing what I thought I was seeing. This would be altocumulus standing lenticular. This cloud, like its cousins in the low and high cloud groups, forms in areas of high wind shear (sudden change in speed and direction of wind). These clouds don’t move, but appear to move as the winds over them cause them to constantly change shape. These clouds are pretty rare over my part of Texas as the shear required to make them often is usually only found near mountainous areas. Pilots normally steer well clear of these clouds because they are indicative of moderate or greater turbulence. Anyway, I wasn’t sure so I decided to monitor the situation. Well, not minutes later, I saw the cloud in the same place but it had a distinct almond shape. I tried to find a suitable place to pull over (I was sitting at a red light when I took this photo), but to no avail. When I got to my destination, the cloud had pretty much dissipated, but I couldn’t wait for it to re-form because I needed to go into my class.


I call this one “The Little Engine That Could”. This was a late evening cumulonimbus that really didn’t stand a chance as the daytime support isn’t there for it. This is a cumulonimbus, but without the characteristic anvil. I was waiting for a left turn at this point and had the camera shooting through my windshield. Since my journeys would be taking me away from the cloud, I didn’t get to see how long it had before it dissipated.

Stuff…

I started my photography class last night. The number one requirement for the course was a 35mm SLR film camera. I borrowed my uncle’s Canon EOS Rebel G. I don’t know where that camera fits into the spectrum of Canon film cameras, but as long it meets the requirement, I’m good. We went over the supply list for the course (the only thing we don’t have to provide is a developing tank), looked at some work from some well known photographers, and then went through the basics of a 35mm film SLR camera. All in all it wasn’t a bad class as I found out something that I should have been doing with my shots that I hadn’t been doing. Perhaps future shots will be relatively free of issues with exposure (unless I deliberately over/underexpose). I also learned a couple of things about the relationship between aperture, distance, and depth-of-field that I didn’t realize before.

One thing that is certainly going to make this challenging is the fact that we’re only going to be shooting black and white for this course. I know that when I turn my color digital photos to black and white it can take a lot of tweaking to get it ‘right’. From what I understand, developing color is more complicated than black and white. If this course goes well, then I’ll take the second semester as well. I suppose in the second semester we’ll learn about color.

Well, I don’t really have photos of my own to present tonight. I have plenty of photos in the archives that I could go through, but I am a little tired tonight and I need to be awake in 6 hours to take my cat to the vet (annual check-up). So, to all of you I bid goodnight.

Failures

Anyone who has ever tried to do photography on a more serious level knows about pictures that don’t quite make it. During my first photography class this evening the teacher told us that we would be lucky to get 3 or more good shots out of a box of film. I know how that goes. I guess it’s a good thing I’m digital because that could get a little expensive in terms of money and time.

But still, a failure in digital can be expensive, especially when you’re counting on at least a couple of shots coming through to the keeper pile. And even with all the great tools available for digital photography, not all photos can be saved. Sometimes we can come up with something passable, but still, for the most part, not usable.

The following pictures were taken with my Powershot G2 at the All That Remains concert here in Houston, TX on 26 January 2007. Now, the G2 is a prosumer camera and normally does pretty well, but I’ve found for concerts the limitations of the prosumer camera are quite… limiting. Admittedly, these were all taken on full auto before I started to understand the finer points of manual control…


This is a picture of Laura Nichol, vocalist for Light This City, with a fan at the show. The color is good and the preview looked awesome in the LCD window… but there was one problem. Notice how the fan’s metal salute is in focus? That was where the camera auto-focused itself and gave me a relatively shallow depth of field. The salute is crystal clear while the actual subjects are out of focus. The manual focus on a Powershot G2 is more trouble than it’s worth – it requires the live view LCD panel and then you only get a small area with which you see your focus point… you can’t tell how it affects the rest of the picture. This was disappointing to me as I thought I was going to have a definite keeper here.


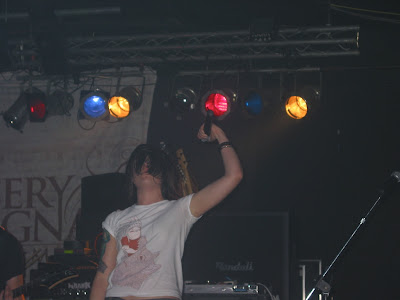
Here is Laura on stage. This one fails because the whole thing is washed out. As this was taken in full auto, not even Aperture, Lightroom, or Photoshop will tell me what the ISO setting was for this photo. Given that this shot is for the most part clear, I decided to try something in Aperture…


I ended up with this picture. I dialed back the exposure, upped the contrast, and changed some saturation levels. For red, green, and dark blue I dialed back the saturation in order to make the stage lights behind her a little less prominent. I then upped the general saturation on the picture. The problem is, now, to me anyway, the light from one of the yellow stage lights looks unnatural. This picture may pass for an average fan’s collection, but commercially there is no way this is viable. I suppose it would be possible to do go balls-to-the-wall in Photoshop, but trying to rescue this in Photoshop would take a lot of time and skill that most people do not have.


Again, extremely washed out. The Powershot G2 does not have the most powerful of flashes and when it has to work against stage lights and be controlled by someone who doesn’t know what they’re doing… well, it makes for a bad day. This particular washout, however, was no worse then the rest of the pack… which leads me to believe there is another culprit to this failure… if you guess the blown out hand at the bottom, you guessed right (at least in my opinion). The flash isn’t the most powerful, and here I had something bouncing the light right back into the glass. I think this picture may have had a shot if not for the hand that got in the way.

Well, those are some of my failures. I have a lot more I can share, but I’ll leave those for another time. As such, I’ll leave you with a success from this past weekend:


Jason Wood of It Dies Today and Mercedes Lander of Kittie. Like most, I had a little bit of washout, so I dialed back the exposure and dialed up the saturations. They colors may look a little oversaturated at first glance. At that point however, there was a red light shining on them. The result was they looked, in real life, like they were saturated with color. I wanted to keep the picture as close as possible to what was being seen (which is subjective, but we do what we do) so I left the red levels alone. All in all, I don’t think this is a bad picture.
Aperture: f/5.6
Shutter Speed: 1/80 sec
Film Speed: ISO 1600 with 0ev
Focal Length: 50mm

The Next Day

I’m getting ready to take a photography class at my school. The class isn’t necessary for my degree (I’ve already fulfilled the art portion), but like I said last night, I want to get better. The class starts on the 28th and runs 2 nights a week for the next 16 weeks. I have a feeling I’m going to have fun…

Speaking of fun, I decided to experiment a little more with my camera today. Today I messed with the BULB exposure setting. The BULB setting lets me keep the shutter open as long as I want (or until the battery dies, whichever comes first). When coupled with a high f-stop and low ISO, you can do some pretty neat things with this function. Living in Houston I don’t get many stars at night so star streaks were out of the question. What I decided to do was photograph my sitting room with the bulb setting. The Aperture on all 3 of the following photos was set at f/2.8, the ISO on all three was 100, and there was zero exposure compensation. The only thing different were the shutter speeds.


This picture of my sitting room was taken with the light on to provide a point of reference. Although in the other shots the camera has moved a little bit, these shots were all taken between 12:30 am and 1:30 am. The shutter speed on this pic is 1/6 sec.


This is the sitting room after 10 seconds of open shutter. All you can see at this point is the light through the curtain.


Here is the picture after 720 seconds… that’s 12 minutes of open shutter. All this is from ambient light in the room. As this room is fairly isolated from the living room and kitchen lights, that means the ambient light is coming from almost opaque curtains. Notice the detail that is captured here but not in the first shot where the light is on. In fact, one could say this was done during the day, but in fact it was shot at 1:30 am on 28 August.

These were by no means the only shots taken. There are more shots of different subjects taken during my experiments with BULB exposure. I chose these as an example. The only digital processing done on these photos was to convert the file formats and shrink the image to a decent file size. I learned more about the relationship of aperture and shutter speed by doing this today.

Well, at this point I’m going to call it a night as it is rather late. Before I go, however, I leave you with a pic that I took over the weekend.


A swampy area in Brazos Bend State Park, Needville, TX. For this I needed to dial back the exposure (quite a bit, which is surprising when you see the stats), dial up the saturation, and fix the highlights (some were badly blown) and shadows (not so much, but a little detail was lost in the exposure). The only other post processing done was to crop the image and convert from CanonRAW to .jpg.
Aperture: f/22
Shutter Speed: 1/15 sec
ISO400 with zero exposure compensation
Focal Length: 19mm

Start of Blog

Here is my first post in my blog. The reason I’m starting this blog here is to have a place to showcase my photos, explain a little bit about them, and talk about the digital side of photography. I got my first DSLR camera for Christmas 2006. Since then I have started to go nuts with photography and even now carry a point-and-shoot digicam wherever I go. I’m learning little by little how things work from a technical standpoint. Maybe soon I can go into the business standpoint, but before that happens I definitely need to get better.

For those of you wondering, the DSLR I have is a Canon Rebel XTi. The spec everyone seems concerned with is this: 10.2 Megapixels. The point and shoot I use is an Olympus Stylus 770SW. At this writing I have 4 lenses for the DSLR. They are as follows:

1. Canon EF-S 18-55mm f/3.5 – 5.6 (this is the kit lens);
2. Canon EF 50mm f/1.8;
3. Tamron SP 17-35mm f2.8 – 4 LD Di Asph;
4. Quantary 28-200mm f/3.5 – 6.3 DiO.

Each lens serves a different purpose. I know these are by no means the best lenses out there on the market, but these lenses collectively cost almost $900… to me they are worth their weights in gold.


Since The Flood – 1 April 2007… my first concert with my DSLR. This pic, believe it or not, was taken using Full Auto Mode on the camera. It’s a little overexposed and the depth of field is a little too deep, but altogether not a bad shot.
Aperture: f/5.6
Shutter Speed: 1/200 sec
ISO 1600
Focal Length: 18mm


The Chariot – 19 May 07… Josh was moving like a maniac through the whole set… this is one of the few pictures with which I managed to stop him.
Aperture: f/5.6
Shutter Speed: 1/30 sec
ISO 800
Focal Length: 55mm


Beneath The Massacre – 8 Jun 07 – These guys were moving around a lot, too. Here I got better color, even if a little overexposed. The cool part is I got it with just a hint of motion from the guitar player.
Aperture: f/5
Shutter Speed: 1/10 sec
ISO 800 with +2.0 ev
Focal Length: 38mm


Since The Flood – 15 Jun 07 – This one got good clarity and better color. The biggest problem was the lighting conditions. I was forced to use flash because the low light and high ISO would have left too much noise in the picture without the flash. I dialed back the exposure compensation a little bit to compensate for the flash. I managed to get a decent exposure; although I did have to up the contrast and saturation a little bit. Also, the other problem was depth of field. The venue sign behind the band is too clear for me.
Aperture: f/8
Shutter Speed: 1/20 sec
ISO 1600 with -2.0 ev
Focal Length: 88mm


First Blood – 15 Jun 07 – This one from the outset had a serious exposure problem – even with a fast shutter speed and a dialed back exposure compensation. Flash was used for this pic. I think that, in combination with a more open aperture, led to the issue. The whole picture was washed out. I like the focus on this one and it was one of the better action shots where Carl was interacting with the crowd. This one became a challenge for me to fix and I like to think I did a good job at it. For this one it was a matter of upping the contrast, dialing the exposure back, and saturating the colors. The depth of field behind the the band was a problem again, and that was probably what contributed most to the exposure issue.
Aperture: f/5
Shutter Speed: 1/125 sec
ISO 1600 with -2.0 ev
Focal Length: 59mm


It Dies Today – 24 Aug 07 – My third time at bat with It Dies Today. This time I got quite a few keepers but this picture is one of my favorites. The only thing that was wrong with this picture was some washout with overexposure. I dialed back the exposure a little bit in post-processing and upped the saturation a little to get his tattoos. The stop in time as he’s moving into a power scream is what makes this picture stand out for me. At this point I had discovered AI Servo focusing, which is intended for moving subjects. This got me an excellent depth of field all night long at this show.
Aperture: f/2.5
Shutter Speed: 1/80 sec
ISO 1600
Focal Length: 50mm


Kittie – 24 Aug 07 – I didn’t really have a pass to shoot this band. But since I already got shots of the band who paid for my ticket (Thanks, IDT!!), I wasn’t really worried about getting kicked out of the show if they got mad. This one was a little overexposed. I lowered the exposure and raised the saturation levels. The last thing I had to do was take the white balance to 6000K. Even with the exposure and saturation fixed, Morgan was looking like a ghost. Raising the white balance temp allowed me to dial back the saturation a little bit so it didn’t look like a pastel party everywhere else in the photo.
Aperture: f/5
Shutter Speed: 1/125 sec
ISO 800 with -2.0 ev
Focal Length: 59mm

I invite any and all comments and constructive criticisms. I want to get better and the only way to do that will be to know what I’m doing wrong.

Newer posts »