Author: Rick (Page 9 of 17)

It’s Almost October

My English teacher wasn’t kidding when he said that I was a glutton for punishment this semester.  A total of 18 contact hours per week is kicking my butt.  Well, it’s all for the greater good of learning, correct?

So now as I struggle with trying to repair a broken upright freezer (and replacing the spoiled food) and dealing with a family member who is being referred to hospice care, I find solace in some of the artwork I’m creating.  I haven’t been creating much on the photographic front as my focus in that course thus far has been technical in nature.  Where the ideas are coming through is in my Computer Imaging course.  We were given a lot of license to play as we wanted with this current project.  The requirements called for 3 composed images with at least 1 image being a self-portrait photograph taken with a DSLR camera and the dimensions on all 3 images were to be 5″ x 7″ at 200 dpi.

I’ve done quite a few self-portraits in the past 12 months, both for assignments and for personal use.  I did not want to take another “normal” self-portrait.  After not too much thought, I came up with this:

Click to Embiggen

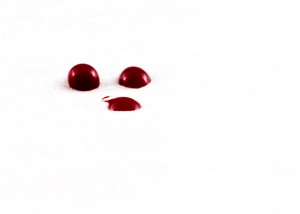
The 3 red dots are drops of my own blood.  Blood is the most elemental part of us as a living being. Blood is also sacred in the spiritual sense.  In simplest terms, it is our essence.  I was a little hesitant when I showed the instructor (that maybe she wouldn’t get it), but she seemed to be very warm to the idea and its originality.  At first I left the paper just off white (as wax paper tends to be), but then the instructor asked if I had considered pushing the edges to pure white.  I had, in fact, considered that, but I was going for strict precision, with almost a clincal feel to the photograph.  But after reading an interview with Elliot Erwitt in a magazine, I realized that photography isn’t about what you see, but how you see it.  So, I pushed the edges to pure white and got an effect better than I expected (I improved the clinical feel as added the feelig that I’ve come to contaminate your sterile little world, watch as my shadow spreads).  I left the imperfection on the flattened drop because I am not perfect.

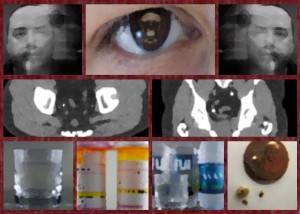
So on we go to Composition 2, or, as I like to call it, the “Kidney Stone Altarpeice.”

Click to Embiggen

This one came to me relatively fast as I was looking through some old images and came across the photo of my kidney stone from earlier this year.  Interestingly, in the week prior to beginning this piece we had studied the Ghent Altarpiece by van Eyck.  Drawing inspiration from that, as well as the ancient Egyptian tomb paintings, I created a narrative in register format using images from my collection, as well as a royalty free image for the Momento Mori element.  You may recognize the eye from my “Evil Eye” composition from this past Spring.  The pictures flanking the center eye element are both the same photograph, just reversed.  It was a long exposure of me sitting perfectly still and then just a half second before the shutter closes I moved as if screaming.  The elements of the middle register are the transverse and frontal views of my kidney stone as seen by a CT scanner.  The bottom register contains a glass of water, the actual pill bottles from the prescriptions given by my urologist after diagnosis, a lot of water, and then the kidney stone(s) next to a penny.  I added a filter to each element to make it look as if it had been painted on brick.  I added that filter to the borders as well to make those areas resemble bare red brick.  I may yet revisit this portion to see if the effect works better with a texture rather than a filter.  The instructor seemed rather pleased as I told a narrative using my own photographs but was able to do it in a non-linear fashion.

And finally, I came to Composition 3:

Click to Embiggen

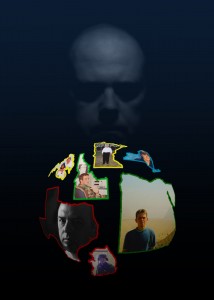
In this particular piece I show myself in different parts of the US and the world.  These are not all the places I’ve been in the world, but these are the places that left a deep impact on who I am and will help shape what I will become.  In each place I have always felt as though someone was watching over me so I could learn the lessons I was meant to learn while there.  This particular one was a little more difficult to realize.  During our individual meetings I showed the instructor the elements of state/nation outlines and photographs.  She said she was “intrigued” by what I had done, but, just like me, she wasn’t sure what I could do to tie them together.  What better way to tie them together than to use a cosmic force?  I had thought about using my “Event Horizon” painting from last year, but I thought to go with the picture of me watching over me (after all, did not God create us in His image?).  I chose to use blue as the base color as it is a benevolent color.  All in all I thought I was rather successful with this one, but we didn’t discuss this one during critique.  I’m not sure if that means it was good or if it was bad.  I guess my grade will reflect what she thought of it.

All in all I’m enjoying this semester as I’m learning more than ever before.  That’s not to say I hadn’t learned anything up to now…  my previous instructors have left deep impressions in my mind.  It’s just that now I seem to be led in a different direction as my mind’s eye is being pried open even further than before.  I’ve already received my next project and I honestly can’t wait to see how the ideas I have for it begin to take shape.

As for now, however, I need to get some sleep.  Goodnight and sleep well to all my faithful and not-so-faithful readers.

Post First Project Entry

Well, the first project for my Computer Imaging course has been submitted for grading.  I guess I will be finding out next week what the instructor thinks of my artwork, but until then I have other things to do.

The next project will be a self-portrait.  As I’ve done three self-portraits in the past twelve months, I wasn’t too thrilled with the assignment.  I have some ideas, however, and I will mull those over in time.  This assignment will be, once again, three different compositions.  The first will be a straight RAW photo that is processed in Photoshop.  I use Lightroom for initial processing of RAW photographs and then only move into Photoshop if I need some heavy duty processing (mostly if I’m going to get extra-creative).  Since I’m not the teacher, however, I will be following instructions like a good little student :-D.  The other 2 compositions are going to be some sort of photomanipulation of a self-portrait using at least three sources.  Also, each of the 2 compositions is supposed to be different.  I have a few ideas on those as well.  This should be, umm, interesting.

Holy crap the new Morbid Angel album is horrible!

The other classes are proceeding apace.  This is going to be a busy but very rewarding semester.  I just had my senior hold removed at UH (I have senior standing due to credits earned at the community college level even though I’m not quite a senior in terms of the courses I’m taking) and then I can start to think strategically on a long term plan for finishing the degree.  I’m looking forward to this challenge, especially now that I’m in the thick of things.

Also, I did promise the three compositions from my first project.  Here is the breakdown:

The 1st composition was to be inside a space of 480 x 360 pixels at a resolution of 72 dpi.  For this one we could only use cut and paste aspects of collage work.  The only exception was that we could resize the image to fit the work if necessary, which is good because 480 x 360 pixels is not a big space in which one can work.

The 2nd composition was to be inside a space of 4.5″ x 3.5″ at a resolution of 200 dpi.  This composition could be manipulated as we saw fit.

The third composition was to be inside a space of 500 x 500 pixels at a resolution of 72 dpi.  In this composition we were allowed to manipulate as we saw fit, but this time we needed a unifying color theme.  I chose orange.

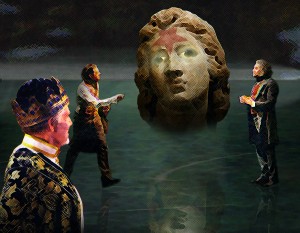
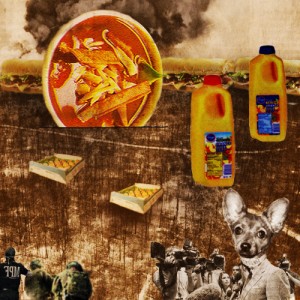
The Houston Chronicle was to be the source for all three compositions.  While not required, it would have been wise to make all three compositions something different and for each one to have a concept behind it.  I conceptualized all three of the my compositions.  Without further ado, here are “Chomp!,” “Lucretia’s Judgment,” and “Revenge of the Food.”

Clcik to Embiggen

Click to Embiggen

Click to Embiggen

These took a little longer than I would have thought.  I’m not much for collage work, so this was definitely a challenge.

Well, I have an assignment for my Fundamentals of Digital Photography class to finish up, so I’m heading out.  I will update everyone soon regarding my progress.  Until then, my faithful and not-so-faithful readers, I bid you goodnight.

Early September – Is it Finals Week Yet?

I’ve been taking classes for 3 weeks now at the University of Houston and am going into the 2nd week at Lonestar College.  This is beginning to kick my butt.  The 12 contact hours total each week at UH isn’t helping anything.  This week we’re going to be kicking things into gear in both my Art History and Government courses.  In my Computer Imaging and Photography Fundamentals courses we kicked things into high gear the 1st day.

Well, enough complaining.  I’ve been hard at work on my first Computer Imaging project.  This particular project is in 3 parts – each one with different parameters in terms of tools used, size, and resolution.  The instructor expects each part to be different, so that’s taking a lot of creative energy.  The unifying thing among the 3 parts is that the elements must come from the Houston Chronicle newspaper.  I have 2 of the parts done…  it’s part 3 that I will have to work on later today(!).

I know this is a pretty short entry, but I’m rather sleepy and I have an appointment in the morning with my academic advisor at UH.  I will post my compositions once I have completed the 3rd.  Football season starts for me on Sunday – so that will give me an escape for about 12 hours a week (yes, I watch that much football during the season hehehe).  Goodnight, everyone.

And August Rolls Around

It is officially 19 August 2011.  Tomorrow night I will be heading to the Texans preseason game where we will be hosting the New Orleans Saints and on 23 August I take the first academic steps my journey toward qualifying to enter the Photography/Digital Media program at the University of Houston.  I still haven’t figured out how I’m paying for this education, but I have a feeling it will work out without too much issue.  I’m taking a total of 12 hours this semester (6 at Lonestar College and 6 at UH).  The interesting part about the UH courses is that they both have 6 contact hours each week, which eats up a significant amount of time.  This could get interesting…

I was reading an editorial in Photo Techniques magazine about the Zone System developed in part by Ansel Adams.  It was an interesting editorial on the applicability of the Zone System in modern photography.  I must admit ignorance of the Zone System as I never really bothered to look into it, which I soon hope to change.  What got me thinking, however, was what the author said about Adams’s use of the Zone System.  In the 5 years that the author worked with Adams in the darkroom, he never once saw the legendary photographer make a straight print from the negative.  Adams was known to use dodging and burning to a large extent on a lot of photographs to get the finished photo that he wanted.  To help streamline that process, Adams developed the Zone System as it allowed him to set the exposure according to his visualization of the scene rather than a straight 18% gray metering.

I found that to be rather interesting, even in my ignorance of how the Zone System works.  I plan to look that up probably in the next day or 2 as I prepare for this weekend’s shooting journey.  I would purchase a book on the subject, but tuition and textbooks eat a large percentage of available cash at any given time.

Admittedly I can be a little on the lazy side when it comes to post-processing.  If an image needs extensive “tweaking” in order to be a fully realized photograph, then I really don’t want to mess with it, even if it’s an artistically nice photo.  I’m working on overcoming that self-limitation, albeit very slowly.  Tonight I got an extra burst of energy after I read that article.  I took an image that was artistically nice and would fit well in my “Marduk” series of photos.  I decided to channel my inner Ansel Adams (minus the Zone System knowledge) and see if I could tweak the image into a fully realized photograph.  I fired up Adobe Lightroom 3 and went to work.

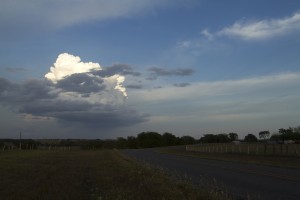
Here is the original of the photo in question (click to embiggen):

As you can see, the exposure on this did not come out like I would have liked (a perfect candidate for Zone System, perhaps?).   I took this photo using center-weighted average metering.  This metering mode meters the light from center portion of the viewfinder and begins to feather outward, taking into account the edges but placing less weight on those readings the further it gets from the center.  The result is that the reading is based more on the light that is in the center, which in this case was the high cloud just to the right of the low cumulus cloud.  The explains why the cumulus cloud top is close to being blown out in some areas.  The high contrast of the scene also left the ground rather dark.  I liked the composition, but initially gave up on it because it was going to require some major tweaking in order to produce a nice photograph.

My first impulse was to correct the white balance.  I pretty much always stick with the “Daylight” setting on my camera.  The reason for this is that experience has shown me that using the Auto setting on white balance almost always yields incorrect results.  Correcting the incorrect values on Auto white balance shots has proven to be more difficult.  I have found that if I use a straight setting that even if the white balance is not correct, correction in post processing is much easier and yields more acceptable results.  Also, having correct white balance helps with the tonality when the image is converted to black and white, which was the next step I took.

The ground, of course, was too dark.  To fix that I used the graduated filter tool to fix the exposure of the ground.  I made the ground lighter and tweaked the contrast a little bit.  This helped to achieve a balance between ground and sky in terms of exposure, but I wasn’t quite done there.  The sky was rather light, and I needed to set the mood (after all, the Sumerian god of thunder deserves something serious!) so I turned down the blue filter, which made the sky nice and dark.  Up to this point these things I did can also be done via traditional means with the use of filters and dodging and burning.

Where I had to go digital was with the clouds in the sky.  The light meter takes things down to 18% gray.  If you meter off a pure white element, the meter takes that into account and reduces the light given off to match 18% gray.  It then figures out the exposure necessary to achieve 18% gray.  So, anything darker in the actual scene is going to be much darker in capture by the camera.  It’s that simple.  The clouds in the center were not 18% gray…  they were just a few shades darker than white.  I had to use the tone curve in order to brighten these clouds.   I pumped up the highlight slider, which lightens the highlights throughout the whole photograph.  This caused the top of the cumulus cloud to become blown out.  Since I knew the highlights in that region weren’t blown out, they could be saved my other means.

After fixing the high clouds, I went in to burn down the highlights in the cumulus cloud so we could see the detail of its fluffy little rolls.  This parallels exactly with dodging and burning in the darkroom, although I have better control in Lightroom than even in Photoshop over this process.  This was probably the longest part of the whole process…  getting the burn to just the right level and trying to stay inside the lines (flashes of being scolded for not doing it in kindergarten suddenly fill my brain) with the brush weren’t easy.

I went digital again with the final tweaks.  The sun on the grass gave it a tonal range that was quite close to the clouds in the sky, but there were some shadows in there.  I needed to tweak the color levels to get the tonal range on the ground just right.  The very last thing I did was crop the image a little to bring a little more balance to the composition.  All told, I spent about an hour on this particular image and I achieved full dynamic range.

The result is “Marduk’s Garrison” (click to embiggen):

What can I say?  The digital toolbox is awesome!

I know why I had the camera set on center-weighted average metering – I took something earlier that was a low contrast scene and in those center-weighted often gives a better reading than the multi-point metering in those situations.  I just forgot to put it back to multi-point metering.  I’m wondering, though, if a knowledge of the zone system would have helped me perhaps get the image closer to what I saw when I made the capture.  At any rate, I’m looking forward to experimenting.

Well, everyone, it is time for me to get some sleep.  You all have a wonderful weekend and GO TEXANS!

Update for July

It has been a busy month…

I spent a week in New York for my 20 year class reunion.  I had a good time as I was able to see a friend I’ve been wondering about since Fall 1991 but have never been able to contact.  I also got some good photos.  Some were tourist-y, but I did get some good artistic shots in as well.  It took a while to go through them all as in the end I took nearly 300 photographs.  Some of them were bracketed shots and I even got some on the tripod in order to attempt some HDR processing (more on that later).

After that I spent time catching up on work that serves to finance this blog.  After some nail-biting over the labor negotiations, we finally have NFL Football back in our lives.  My season tickets arrived just the other day.  Now I need to print some tickets to attend the open training camp days so I can get some new pics this year.  Last year I also attended a Minnesota Vikings training camp, which was fun.  I would like to attend a different team training camp this year, but for some reason I don’t think it’s going to happen.

And today I started the path to my formal photography education as I attended the new student orientation at the University of Houston.  I was surprised to find that I’m classified as a senior even though I have at least 4 semesters worth of work ahead of me.  The advisor told me that it’s probably based on the hours I accrued at Lonestar in pursuit of my AAS Management.  As I’m completing my core requirement (2 courses left!) at the Community College level, I didn’t want to take too many University-level courses.  It’s actually a good thing at this point – only 1 course I needed was open for registration as of today.  So, I am now taking an course in “Selected Topics in Art History.” There is a digital photography course I am required to take, but again that’s full.  I was told that a there is currently a pending request to add another section, but they are not sure if it will be approved in time for the Fall Semester.  If it isn’t approved I will need to sneak in behind someone who didn’t pay on time or try to get the instructor’s permission to take on another student.  On a good note, I was pleasantly surprised to find that I completed 9 of my 12 required hours of fundamental studio art courses (the digital photo course will make 12) and the advisor is giving me permission to take Junior level art courses as soon as they become available!

So, in a nutshell, that was my month of July.  I have also been making photographs, as you may have seen in the gallery site.  I swear I will one day unify both the gallery and the blog, I just need to find the time to work that out.  August will be a flurry of activity as I figure out how to pay for classes, start classes, and try to make art.  I hope you all are enjoying your summer.  For those you who have not seen my body of work, the link is below and on the home page.  Have a good night, everyone.

Rick’s Picture Corner Gallery

Update for June

Yep, it’s been a while since I’ve updated.  I guess I’ve just been kind of relaxing the part of my brain that wants to make art.  That’s not a bad thing, but I do need to get back down to business as far as that goes.

For the semester I received 2 grades of A (English II and Digital Art) and 1 grade of B (Art History I).  I would have liked 3 A’s, but my silliness in regards to some Art History assignments caused those potential grades to become 0’s, which dragged my grade down quite a bit.  I also spoke with an advisor at the University of Houston a couple of weeks ago.  I found that I’m not too far from being able to apply for the Bachelor’s of Fine Arts – Photography program at the school.  Right now there are a couple of core classes along with some foundational art classes that I can take at the community college level and there are a couple of art courses I need to take at the university level as no community college equivalent exists.  I also found out that I can take them concurrently, which is a huge bonus!  I have my application to attend the University of Houston submitted and at this time I simply await their rejection (not likely but always possible) or their telling me what to do next.  I’m getting pretty excited, kinda like the first time I went to an NFL game.

I also discovered a new paper just today.  It’s called Museo Silver Rag.  It’s a luster paper, which means it has some gloss (which is great for color gamut) but is not so shiny as to cause vision loss when the light reflects off the surface and into your eyes at certain angles.  The colors on this photograph I printed really popped, and the saturations where incredible – better than the MOAB Lasal Luster I have been using to this point.  The only problem is that the Museo Silver Rag is more expensive than the MOAB papers I usually use, and, at least locally, it is a little harder to obtain.

Well, at this point I’m going to say goodnight.  Have fun, everyone, and I will be back soon.

The Latest Toy

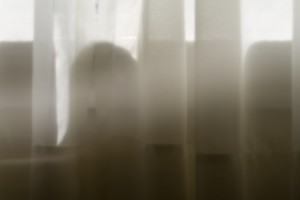
On 21 April I picked up the pinhole optic for my Lensbaby Composer.  Unfortunately, 21 April was also the middle of the end-of-semester crunch, which hasn’t left me much time to play with my new toy.  I’m happy to report at this point I have 1 more project component left for my Art History class (which will be done later today) and only 1 more exam left this semester.  Today I was going to do some serious playing with it, but got caught up in work-related duties, but I’m happy to report that I did take a few photos of the same subject while experimenting with different exposures and tilts of the optic.  Here is what I think was the best photo:

Click to Embiggen

Since the pinhole itself is literally a hole, I quickly realized that tilting the Lensbaby wasn’t really going to give me a “sweet spot.” Turning the focusing ring gave me a little bit of zoom, but no change in focus because there is no glass.  Given that the sheer curtains diffuse the light, the softening effects from the optic were seemingly intensified, for an overall softness that, to me at least, reminds me of the morning mind fog after you have opened your eyes fully from a sound sleep.  Please don’t mind the 2 spots on the photo – it looks like I may have a little dust on the sensor.   It has been a while since I’ve cleaned it.

I’m thinking I’m going to have a lot of fun with this optic if I can get an opportunity to play with it some more.  New toys can be so much fun!

Composition

“Ladies and gentlemen, boys and girls, and wild ones of all ages.  Step right up.  I welcome you to come right in…  inside the electric circus.”

 – “The Big Welcome” – WASP (1986)

As far as album introductions go, I personally think that’s one of the coolest I’ve ever heard.  It’s not your typical heavy metal intro…  no guitars, no drums, just some circusorgans playing and a big top emcee inviting one into the tent.  Of course, then it kicks into high gear with the title track.  WASP was never really known for their strong songwriting, but they did have their moments in the late 80’s/early 90’s…  but Idigress.

As in all visual art, composition is key to making a successful photograph.  Without good composition, a photograph becomes merely a picture of something.  But what is composition and what makes a composition a good composition?  That’s a tough question since there are no hard and fast rules of art, only guidelines that should, at the very least, be considered when creating a piece.  Unfortunately, there are nearly as many opinions on the answer to that question as there are people on the planet.  My answer to the first part of the question is this:  In composing the photograph, one must always pick out the element of emphasis and let all the other elements in place support that emphasis.  Sounds simple, no?  That hard part is, however, achieving “good’ composition.

The ruling guideline with a lot of “professional” photographers right now is a concept called “Rule of Thirds.”  Basically in this “rule” you take your frame, draw three lines horizontally, and make them equidistant from each other.  You repeat the process once more, this time drawing vertical lines, to end up with 9 rectangles.  You then have 4 intersections inside the frame.  When composing your photograph you want to place your subject on one of those points (often this is called the “power position”).  When I started learning about photography, I read a lot of Popular Photography magazine.  When I would read their image crititiques, they would invariably crop an image to conform to the Rule of Thirds.  It really didn’t matter what was in the photo, they wanted it to conform to that rule.  At the time I took the Rule of Thirds as sacrosanct and attempted to compose all of my photos in that manner.  The fact that I wasn’t always successful was beside the point – this was something I was shooting for which each photo.

When I took my first photography class in 2007 my professor never really discussed Rule of Thirds unless she noticed a student who seemed to be struggling with composition.  Given everything I had read in Popular Photography at that point, I wondered a little bit why she didn’t talk about it much.  When I consulted the text book on composition, it also spent very little time discussing the rule.  I just kept on doing what I was doing.  Then one day during a class critique session my professor pointed out something she found interesting in another student’s photo and brought up the concept of CLOTIS.  Basically, this concept told that if you arranged the elements in the frame in such a way that it formed one of the letters in that word, you made what was called a “safe” and what could be considered a “good” composition.  The Rule of Thirds was not as sacred as I had been led to believe and here was a professional MFA Photography professor giving me license to break that rule if it didn’t work.

There is a reason why one should avoid placing the subject in dead center of the frame – it basically keeps your eye fixed on that one point in the photograph and you have to actually work to look around the photo.  In the early 1920’s Arthur Hammond wrote that the reason why this bothers people is because it causes actual physical exhaustion due to the muscles that articulate the eye being exerted.  I laugh this off because unless a person is having some serious metabolic issues, the tiny movements of the eye aren’t really going to force someone into having to take a nap because of tiredness, but I get the point.  A person is going to have to actively think about looking around the frame instead of being led around in a natural manner.  Some may say this is the sheeple in everyone coming out, but I’ll leave that to those who study human behavior to debate that point.

But what if the Rule of Thirds is not practical?  Admittedly that wasn’t a question I thought much about before my professor mentioned the concept of CLOTIS.  What if my subject was too large to be placed neatly into one of those power positions?  I then started to realize that a subject can be placed close to center if it fills (or comes close to filling) the frame or if it can be arranged in such a way that your eye is guided naturally from the subject around the photo (which would be something CLOTIS-like at work).   I have plenty of photos that many consider successful (at least at my level of accomplishment at the time they were created) that don’t necessarily adhere to the Rule of Thirds.

The Rule of Thirds deals mainly with the placement of elements around a frame, as does CLOTIS to an extent.  There are plenty of other concepts relating to the use of lines and shapes that come into play (which is something that CLOTIS also covers).  Some of the aforementioned successful photos (often unconsciously) incorporate those other concepts, while others do not.

Ok, so why am I writing about this?  The answer is simple – I was not happy with something I was told today by a “professional” photographer.  The photos he looked at today weren’t exactly the pick of the litter (long story behind why I didn’t have my best photos with me, but rest assured the fault lies with the event organizers regarding this), but they were judged by more than a few degreed professionals and lay-people as successful.  The biggest problem he found with the photos I had was composition.  The thing that really got me was he kept going back to Rule of Thirds and how most of those images didn’t achieve their potential because of Rule of Thirds.  On one photo he claimed the subject was too dead center (it was not) and that spoiled the whole photo.  I pointed out to him that the subject came close to filling the frame and that the point of focus I was going for was actually quite close to the upper left power position, to which he replied that I should never be filling the frame.  I was a little perturbed by this.  I mean, if he didn’t get why chose the focal point I chose, then that’s fine.  But here he was dismissing it due to adherence to a “rule” that is more often than not broken.  This left me a little puzzled as in the three professors who have taught me photography thus far (each one a professional artist and photographer and each wiht a lot of experience in various areas of the field) have never stuck so close to the “rules” of composition when critiquing a piece by anyone in class.  There was one photo I submitted (among my best) that was textbook Rule of Thirds in compostion and this particular photo was his second favorite.  Here is the kicker – his favorite photo (and a favorite among the group critique) actually did not adhere to the Rule of Thirds.  I thought about calling him on this, but I quickly realized I wasn’t there to argue with him.

Now here’s the conclusion (I know what you’re thinking “it freaking took you long enough!”) – The “rules” of composition are merely guidelines that  more often than  not work to create effective photographs.  There are times when they can be ignored and times when they can be broken, and it’s up to the artist to know when those actions are appropriate.  Adherence to hard and fast rules only lead to dogmatic thinking in a given medium, and in the end the art suffers because of it.  The Rule of Thirds is an effective starting point for beginners because it helps them keep the subject out of dead center.  For those more advanced it becomes a good guide and while I rarely see it flouted, I also rarely see strict adherence to it.  This person who looked at my photos today demanded strict adherence to it.

I was told by this person to look at a lot of other people’s photographs (I do – just ask my wife about all the photography books in the house) but to remember that just because it’s hanging on a wall or printed in a book doesn’t necessarily mean it’s good.  I laughed a little inside as the thought entered in my mind that just because one calls theirself a photographer doesn’t mean he or she knows much about photography.  He was listed on the signup sheet as a photographer, sculptor, and woodworker – that right there should have sent up a red flag (a 3-D artist who dabbles in 2-D, but he was the only person with open slots).  In all fairness, there were a few non-compositional things he said about my work that he thought could use some improvement, with which I had absolutely no problem.  Ninety percent of his feedback, however, was devoted to composition and Rule of Thirds.  As an aside, I shared what I was told with my Digital Art professor (who also happens to be my 3rd photography professor and MFA with over 25 years of experience in the field) and she seemed a little puzzled by this person’s feedback as well.

I am personally bewildered by the strict adherence to the Rule of Thirds by so many “professionals” today.  In reading some older work on photography, especially after it broke out of its image as a mechanicial activity and gained recognition as an artistic medium, the subject of Rule of Thirds  is briefly touched upon.  However, it is only regarded as a starting point used when forming ideas for a composition.  The current, almost fanatical following, to me at least, is restricting the artisitic side of photography.  Granted, magazines like Popular Photography don’t necessarily cater to more advanced photographers.  That and the fact that the magazine is 80% product reviews pretty much caused me to stop reading it halfway into my Photography I course.  I would think, however, since those who read this magazine in particular have more than a passing interest in photography, they would encourage a little bit of artistic experimentation.  The upside, however, is that they’re at least trying to introduce some intellectual element into composition – a friend of mine was told once (by a complete layperson) that the subject MUST ALWAYS be in the center and fill the frame of a photograph.  Talk about your bad advice.

Do I have a lot to learn?  Of course I do.  While I remain confident I’m on the right track, I know I have a long way to go before I can achieve something close to the levels of the masters such as Keith Carter, Paul Strand, and Henry Cartier-Bresson (among others).  That’s why I will keep studying, shooting, and seeking feedback from those I admire to whom I have some access and have built a relationship.  I would like to give a shout to those three professors who have taught me so much so far – Steffani Frideres, Troy Huetchter, and Laury Emery.  Without them I don’t think I would have ever rediscovered my artistic side.  What I found interesting and very promising was this – one of the Photography professors from another college in the area told me to look her up when I got the chance.  She may, of course, want to tell me to forget it and that I have no talent, but something in her demeanor in talking to me told me she saw some potential in me.  The journey is starting to get interesting.

Well, it’s late and I have other things to do before I go to bed.  To all of you who made it this far – thank you for enduring my rant.  To all of you I bid you goodnight.
Frustrating

Red is just one of those wavelengths that frustrates the hell out of me sometimes.  When I was shooting a lot of concerts I would have problems with blown highlights because heavy metal performers love red lights.  There was a really good photo I got of Erik Rutan from the death metal band Hate Eternal that eventually ended up as a black and white photo because I could not get the red light on his skin properly adjusted.  The problem, however,  isn’t just limited to the digital image on the screen, it also manifests when I’m trying to print certain red wavelengths on my Epson 2880.  When I shot the April 2008 performance of Mushroomhead in Houston, I got a really good photo of one the vocalists (click here to see the photo).  I was ready to use it as an image for a class project.  Unfortunately, it cost me a lot of money in terms of paper, ink, and time only to realize that I could not get the red to print digitally without the blown highlights.  I ended up getting it printed through a third part using the digital chromogenic process (digitally exposing an image on color photographic paper then developing the paper as you would normally) – the professor had given his blessing on using that method when he assigned the project.  The photographic paper properly rendered the colors and I was able to use the image.

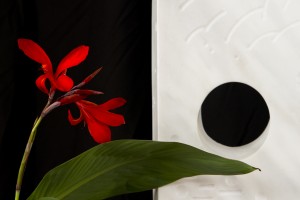
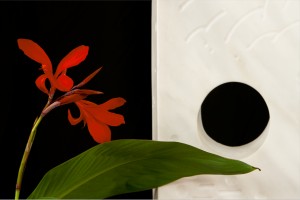
Fast foward to 2011 – I haven’t thought about it much since then as I haven’t had any photos to be printed that were flooded with red light.  Yesterday I took some photos of a monolithic scultpure for someone.  As part of the composition we placed a red orchid-type flower next to the piece and while the owner was cleaning off another plant I took some artsy type shots of the flower and scultpure.  Here is the photo that I ended up with:

Click to Embiggen

As part of post processing I increased the luminosity of the red in the flowers in order to really get a good contrast against the white marble of the sculpture.  I was pretty proud of the digital result and decided that this particular photo needed to end up in my print collection (also for sale if anyone is interested).  So I fired up Photoshop, made the adjustments to Brightness (my printer tends to print a little darker than it appears on screen) and went to the print dialog.  Unfortunately, a large area of reds in the flower were out of gamut for the printer and paper profiles.  “Dammit!” I thought, “Not this again!” I printed a low quality test and the reds were blown out, as in the subtle tonal changes were gone.

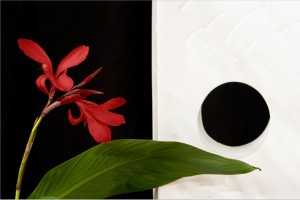
So, I consulted Photoshop help and figured out how to view gamut warnings in real time when working with the images.  As an added bonus it could reproduce the gamuts of the various paper ICC profiles I have installed.  Since I primarily use luster paper (it’s a nice middle ground between glossy, which I don’t like, and matte, which often looks washed out) I was able to get a good idea of its limitations.  I attempted to replace the colors.  While I was able to save the subtle tonal changes, the resulting colors were not really true to what I wanted:

Click to Embiggen

As you can see, the reds are now a pinkish color.  It doesn’t look bad, but it’s not the true color of the flower.  For this particular photo I wanted to stay as true to the actual colors as possible.  What to do?  What to do?

I looked at the other paper types I have and tried those profiles.  I found that with the matte finish papers I have (Velvet and Somerset) I got more of the colors in gamut, but still had a large area outside the gamut.   Then I realized that last week a couple of sheets of Ilford Galerie Smooth Pearl inkjet paper came into my possession.  I installed that profile and viewed the gamut warning.  I was amazed to find that this paper had a larger gamut than the Legion papers that I had been using.  There was still an area of reds that were out of gamut, but the area was much smaller than before.  I opened the color replacement dialog and then found the in-gamut replacement color very closely matched my original processing:

Click to Embiggen

I lost a little bit of the tonal changes, but in the final print the changes were still extremely subtle.  I score this as a win.  The print itself turned out great, although it is a little more glossy than I normally use, I can see this paper finding its way into my printer when the need arises.

What did I learn from this?  There are A LOT of different papers out there (which I already knew) but the differences in color gamut between the brands seems to be more than I initially thought.  Unfortunately, the quality papers are not cheap – my Legion MOAB Lasal Luster (11 x 17) costs US$70 for 50 sheets and that’s in the mid-range price for that size paper.  There is also the issue of ink costs (US$15 per cartridge for the Epson R2880 – these don’t hold much ink at all), time, and waste.  Clearly, experimentation is going to cost a lot of money and that’s something I will only be able to do over a long time.  If I could afford a digital chromogenic setup then I would be all set, but that’s quite the capital investment there.  The upside of this is I gained a bit of understanding of the printing process, a bit more understanding of color, and learned a few more tricks in Photoshop.  I also found that printmaking is not something simple…  there is a lot more to learn about this.  What am I getting myself into?

Well, that’s all for now.  I hope everyone is having a good Easter and I will see you all again soon.

End of Semester Crunch

I am happy to report that I am finished with my English course.  After the midterm we had 4 classes then moved straight into our final paper.  The professor set it up to where we had to give a presentation on our papers, but only a couple people would be presenting per night and you didn’t have to come to class until you were scheduled to present.  I gave mine just this past Wednesday and he gave me my final grade today (I got an A!).  The best part, once the presentation is complete, that’s it for your semester.  This definitely takes a load off my mind as we move into the final stretch.  I have one more art project, an audio tour (and accompanying paper), and two finals left to go in the next couple of weeks.

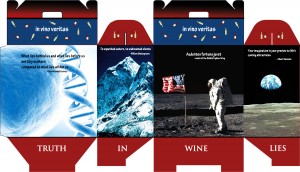
I finally finished my retail package.  I completed the design and print run about seven hours before it was due.  It took three attempts to get the printer settings correct (kinda hard with generic paper and no profiles) and it ended up being a matte finish, but that’s ok.  I cut the design and folded it and then realized that I screwed up on the placement of two words on the bottom.  As it was nearly 3 am when I realized this, I ran another print in the hopes I would get a chance to cut and fold during the class, but no such luck befell me.  It’s ok, I hope she doesn’t ding me too hard for that little design flaw.  I chose to make a wine box and made a fictitious little company called “In Vino Veritas.” The artistic theme for the design was to be something to do with self-improvement.  I chose “Believing in Yourself” and put little inspirational quotes over photos of things that we as human beings have accomplished.  The first was the discovery of DNA, the second was Mount Everest, the third was Neil Armstrong with the US Flag on the surface of the moon, and the fourth was a picture of the Earth as seen from the moon.  On the bottom I put “In Wine Lies Truth” (it was here I messed up the placement of the words “In” and “Lies” – they were partially covered by the fold flaps).  On the top flaps I placed a solid color and little scattered graphics of wine bottles.  Here is the template graphic for the project:

Click to Embiggen

Some of you out there may recognize the 366th Fighter Wing motto, but I digress.  The professor has the completed project at this time.  When I get it back I will take some photos to show what it looks like in its final form.  I wish I would have had time to take it to Kinko’s to have it printed on glossy cardstock as the matte finish doesn’t allow the colors to pop at all.  But hey, at least I got it done.

Now my wife is wanting me to design some boxes for the giveaways for her parents’ Golden Anniversary next year.  Is it unethical to charge this to my in-laws?

Now I’m on to my next project, which is to create a postage stamp.  It can be from any country, real or imaginary, and has to have at least one example of each of the following: a currency notation and price, a scanned texture, and an edge like you see on real postage stamps but this one has to be created using Photoshop’s vector pen tool.  I have a few ideas and will hopefully begin executing them shortly.

Sweetness came to me today in the form of a piece of plastic.  I have been wondering about pinhole photography for a while, but never really felt like buying a body cap and drilling a tiny hole into it to give it a shot.  The other thing that turned me off about that idea, too, was the fact that the hole would allow dust into my sensor while the mirror was up.  Well, I have to worry no more…  I found out Lensbaby makes a pinhole optic for their Composer lens.  And it is only $35 at Camera Co-Op.  Happy Birthday to me!!!  Tomorrow I will be taking it outside while the sun is high so I can see what my mind can create.  I am soooo looking forward to this.

At this point I have one more picture I can share with you from my gallery.  Feel free to comment at will.

Click to Embiggen and See Gallery

Well, my friends, I need to pop in that Celtic Frost CD and get back to work.  You all have a safe and happy Easter Weekend and I will see you all again soon.

« Older posts Newer posts »